Objective: Install Oracle 11g RAC database on Oracle Grid Infrastructure running on 64 bit Oracle Linux Virtual Machines in ESXi 5.5
d. Add additional Hard Disk in one of the nodes to temporarily place Oracle software as staging area (optional step).
I downloaded (e) and installed (f) in my Win 7 laptop where vSphere Client 5.5 is also installed:-
e. 64 Bit Oracle Database 11.2.0.3 Software from Oracle.
f. Installed Win SCP "winscp440setup.exe" software (Windows Secure Copy tool from winscp.net).
Copy zip files (installable software) to staging area in node1
1. Start both nodes (VMs)
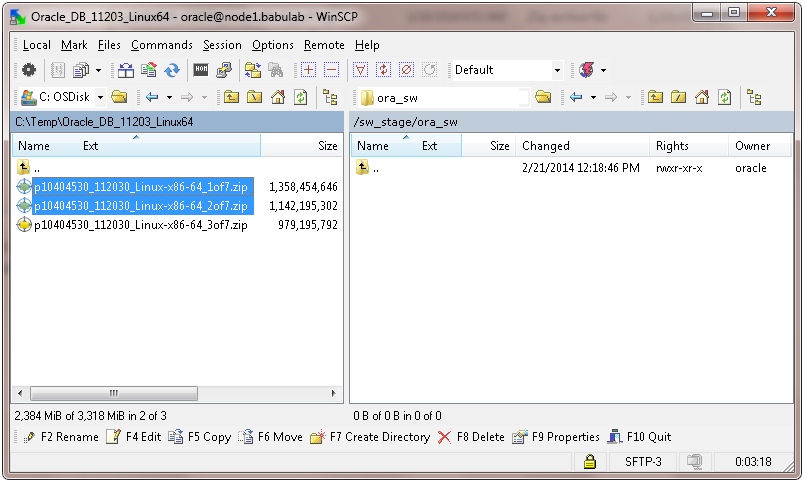
2. Using Win SCP, copy Oracle 11g RAC database files (p10404530_112030_Linux-x86-64_1of7.zip and p10404530_112030_Linux-x86-64_2of7.zip) located in my laptop to the staging area in node1.babulab virtual machine in the EXSi host.
Start Win SCP and connect to "node1.babulab" as "oracle" user:-
Navigate to the source and destination folders, select the source files:
Drag and drop them to the destination folder (/sw_stage/ora_sw):
Copying on progress:
After copy is complete, click session and disconnect Win SCP.
Unzip the files and start cluster services:-
3. Log in as "oracle" in node1.babulab, navigate to folder "/sw_stage/ora_sw/" where the zip files were copied, extract them and delete the zip files:-
$ cd /sw_stage/ora_sw
$ unzip p10404530_112030_Linux-x86-64_1of7.zip (it will create a folder called "database" and unzip in it)
$ unzip p10404530_112030_Linux-x86-64_2of7.zip (it will unzip and append to the already unzipped files in "database" folder)
$ rm *.zip (delete files to free up space)
4. Log in as "root" in both nodes and start the ASM / HA cluster resources in both nodes.
[root@node1 oracle]# . oraenv
ORACLE_SID = [oracle] ? +ASM1
The Oracle base has been set to /u01/app/oracle[root@node1 oracle]# crsctl start crs
Wait for a few minutes until all the cluster services are started, then check the status to see if all the necessary services are up and running:
[root@node1 oracle]# crsctl status resource -t
--------------------------------------------------------------------------------
NAME TARGET STATE SERVER STATE_DETAILS
--------------------------------------------------------------------------------
Local Resources
--------------------------------------------------------------------------------
ora.DSK_GRP_01.dg
ONLINE ONLINE node1
ONLINE ONLINE node2
ora.LISTENER.lsnr
ONLINE ONLINE node1
ONLINE ONLINE node2
ora.asm
ONLINE ONLINE node1 Started
ONLINE ONLINE node2 Started
ora.gsd
OFFLINE OFFLINE node1
OFFLINE OFFLINE node2
ora.net1.network
ONLINE ONLINE node1
ONLINE ONLINE node2
ora.ons
ONLINE ONLINE node1
ONLINE ONLINE node2
--------------------------------------------------------------------------------
Cluster Resources
--------------------------------------------------------------------------------
ora.LISTENER_SCAN1.lsnr
1 ONLINE ONLINE node1
ora.LISTENER_SCAN2.lsnr
1 ONLINE ONLINE node2
ora.LISTENER_SCAN3.lsnr
1 ONLINE ONLINE node2
ora.cvu
1 ONLINE ONLINE node2
ora.node1.vip
1 ONLINE ONLINE node1
ora.node2.vip
1 ONLINE ONLINE node2
ora.oc4j
1 ONLINE ONLINE node2
ora.scan1.vip
1 ONLINE ONLINE node1
ora.scan2.vip
1 ONLINE ONLINE node2
ora.scan3.vip
1 ONLINE ONLINE node2
Installation of Oracle 11g RAC database:-
5. Once the Cluster/HA resources are up in both nodes, log in as "oracle" user in node1.babulab and start the installer:-
[oracle@node1 ~]$ cd /sw_stage/ora_sw/database
[oracle@node1 database]$ ./runInstaller
Starting Oracle Universal Installer...
Checking Temp space: must be greater than 120 MB. Actual 7064 MB Passed
Checking swap space: must be greater than 150 MB. Actual 4031 MB Passed
Checking monitor: must be configured to display at least 256 colors. Actual 16777216 Passed
Preparing to launch Oracle Universal Installer from /tmp/OraInstall2014-02-22_04-28-01AM. Please wait ...
[oracle@node1 database]$ You can find the log of this install session at:/u01/app/oraInventory/logs/installActions2014-02-22_04-28-01AM.log
6. You will be started with below screen, I chose not provide my email address and not receive any updates from Oracle. Since this is an install in my lab for testing purposes.
7. In the Installation Option, select "Create and configure a database"
8. In the system class, select "Server Class"
9. In the below Grid Installation Options screen, select "Oracle Real Application clusters database Installation" and click Next (you don’t have to click "SSH Connectivity")
10. In the Install Type screen, select "Advanced Install", click next and choose the product language in the next screen (I selected English)
11. In the Database Edition screen, select "Enterprise Edition"
12. In the Installation Location screen, I accepted the defaults, you can change it if you wish:-
13. In the Configuration Type screen, select "General Purpose / Transaction Processing"
14. In the Database Identifiers screen, provide the global DB name and SID.
15. I accepted the defaults in the Configuration Options:-
The installer automatically grabs 40% of the available system memory from the VM to Oracle DB and enables Automatic Memory Management, which is fine.
Just to show you the default values of other tabs that I used:-
16. In the Management Options,select use OEM DB control for DB management
17. In the DB Storage options, select Oracle ASM and specify the password you want to use.
18. In the Backup and Recovery screen, don't enable it.
19. Select the ASM disk group where you want to place the database files"-
20. In the schema passwords, I chose to use the same passwords for all accounts, specify and confirm the password, acknowledge the warnings due to lack of password complexity:-
21. In the OS Groups, I selected "oinstall" for both OSOPER and OSDBA groups.
22. It will perform the prerequisite checks and throw below warnings. (same as what we saw during the grid install, 1st one is a bug, 2nd one is because we were not using DNS/GNS to resolve SCAN).
Check "Ignore All" and acknowledge the warning:-
23. Review the summary and click Install
24. Once the database creation is complete, it will confirm with below screen, note down the info and click OK:-
25. Next, you will be asked to run "root.sh" as "root" user:-
First run it in node1 (where install is initiated from):-
[oracle@node1 ~]$ su root
Password:
[root@node1 oracle]# /u01/app/oracle/product/11.2.0/dbhome_1/root.sh
Performing root user operation for Oracle 11g
The following environment variables are set as:
ORACLE_OWNER= oracle
ORACLE_HOME= /u01/app/oracle/product/11.2.0/dbhome_1
Enter the full pathname of the local bin directory: [/usr/local/bin]:
The contents of "dbhome" have not changed. No need to overwrite.
The contents of "oraenv" have not changed. No need to overwrite.
The contents of "coraenv" have not changed. No need to overwrite.
Entries will be added to the /etc/oratab file as needed by
Database Configuration Assistant when a database is created
Finished running generic part of root script.
Now product-specific root actions will be performed.
Finished product-specific root actions.
Then complete run the same in (all nodes) and then click OK on the above screen.
26. This is the final screen as part of 11g RAC install, note down the OEM URL and click Close
27. Here are few commands that I used:-
Check the status of the database, log in as "oracle" user:-
[oracle@node1 ~]$ . oraenv
ORACLE_SID = [oracle] ? best
The Oracle base has been set to /u01/app/oracle
[oracle@node1 ~]$ srvctl status database -d best
Instance best1 is running on node node1
Instance best2 is running on node node2
[oracle@node1 ~]$ srvctl config database -d best
Database unique name: best
Database name: best
Oracle home: /u01/app/oracle/product/11.2.0/dbhome_1
Oracle user: oracle
Spfile: +DSK_GRP_01/best/spfilebest.ora
Domain: babulab
Start options: open
Stop options: immediate
Database role: PRIMARY
Management policy: AUTOMATIC
Server pools: best
Database instances: best1,best2
Disk Groups: DSK_GRP_01
Mount point paths:
Services:
Type: RAC
Database is administrator managed
[oracle@node1 ~]$ export ORACLE_SID=best1
Connecting the RAC database through SQL*Plus
[oracle@node1 ~]$ sqlplus / as sysdba
SQL*Plus: Release 11.2.0.3.0 Production on Sat Feb 22 06:10:19 2014
Copyright (c) 1982, 2011, Oracle. All rights reserved.
Connected to:
Oracle Database 11g Enterprise Edition Release 11.2.0.3.0 - 64bit Production
With the Partitioning, Real Application Clusters, Automatic Storage Management, OLAP,
Data Mining and Real Application Testing options
SQL> select * from v$active_instances;
INST_NUMBER INST_NAME
----------- ------------------------
1 node1.babulab:best1
2 node2.babulab:best2
SQL> exit
Disconnected from Oracle Database 11g Enterprise Edition Release 11.2.0.3.0 - 64bit Production
With the Partitioning, Real Application Clusters, Automatic Storage Management, OLAP,
Data Mining and Real Application Testing options
Check the status of the cluster, log in as "root" user:-
[oracle@node1 ~]$ su root
Password:
[root@node1 oracle]# . oraenv
ORACLE_SID = [best1] ? +ASM1
The Oracle base remains unchanged with value /u01/app/oracle
[root@node1 oracle]# crs_stat -t
Name Type Target State Host
------------------------------------------------------------
ora....P_01.dg ora....up.type ONLINE ONLINE node1
ora....ER.lsnr ora....er.type ONLINE ONLINE node1
ora....N1.lsnr ora....er.type ONLINE ONLINE node2
ora....N2.lsnr ora....er.type ONLINE ONLINE node1
ora....N3.lsnr ora....er.type ONLINE ONLINE node1
ora.asm ora.asm.type ONLINE ONLINE node1
ora.best.db ora....se.type ONLINE ONLINE node1
ora.cvu ora.cvu.type ONLINE ONLINE node1
ora.gsd ora.gsd.type OFFLINE OFFLINE
ora....network ora....rk.type ONLINE ONLINE node1
ora....SM1.asm application ONLINE ONLINE node1
ora....E1.lsnr application ONLINE ONLINE node1
ora.node1.gsd application OFFLINE OFFLINE
ora.node1.ons application ONLINE ONLINE node1
ora.node1.vip ora....t1.type ONLINE ONLINE node1
ora....SM2.asm application ONLINE ONLINE node2
ora....E2.lsnr application ONLINE ONLINE node2
ora.node2.gsd application OFFLINE OFFLINE
ora.node2.ons application ONLINE ONLINE node2
ora.node2.vip ora....t1.type ONLINE ONLINE node2
ora.oc4j ora.oc4j.type ONLINE ONLINE node1
ora.ons ora.ons.type ONLINE ONLINE node1
ora.scan1.vip ora....ip.type ONLINE ONLINE node2
ora.scan2.vip ora....ip.type ONLINE ONLINE node1
ora.scan3.vip ora....ip.type ONLINE ONLINE node1
[root@node1 oracle]# exit
exit
[oracle@node1 ~]$ srvctl stop database -d best
[oracle@node1 ~]$ srvctl status database -d best
Instance best1 is not running on node node1
Instance best2 is not running on node node2
As "root" user and check the status of the cluster:-
[oracle@node1 ~]$ su root
Password:
[root@node1 oracle]# . oraenv
ORACLE_SID = [best1] ? +ASM1
The Oracle base remains unchanged with value /u01/app/oracle
[root@node1 oracle]# crsctl stat resource -t
--------------------------------------------------------------------------------
NAME TARGET STATE SERVER STATE_DETAILS
--------------------------------------------------------------------------------
Local Resources
--------------------------------------------------------------------------------
ora.DSK_GRP_01.dg
ONLINE ONLINE node1
ONLINE ONLINE node2
ora.LISTENER.lsnr
ONLINE ONLINE node1
ONLINE ONLINE node2
ora.asm
ONLINE ONLINE node1 Started
ONLINE ONLINE node2 Started
ora.gsd
OFFLINE OFFLINE node1
OFFLINE OFFLINE node2
ora.net1.network
ONLINE ONLINE node1
ONLINE ONLINE node2
ora.ons
ONLINE ONLINE node1
ONLINE ONLINE node2
--------------------------------------------------------------------------------
Cluster Resources
--------------------------------------------------------------------------------
ora.LISTENER_SCAN1.lsnr
1 ONLINE ONLINE node2
ora.LISTENER_SCAN2.lsnr
1 ONLINE ONLINE node1
ora.LISTENER_SCAN3.lsnr
1 ONLINE ONLINE node1
ora.best.db
1 OFFLINE OFFLINE Instance Shutdown
2 OFFLINE OFFLINE Instance Shutdown
ora.cvu
1 ONLINE ONLINE node1
ora.node1.vip
1 ONLINE ONLINE node1
ora.node2.vip
1 ONLINE ONLINE node2
ora.oc4j
1 ONLINE ONLINE node1
ora.scan1.vip
1 ONLINE ONLINE node2
ora.scan2.vip
1 ONLINE ONLINE node1
ora.scan3.vip
1 ONLINE ONLINE node1
Stop the cluster:-
[root@node1 oracle]# crsctl stop crs
CRS-2791: Starting shutdown of Oracle High Availability Services-managed resources on 'node1'
CRS-2673: Attempting to stop 'ora.crsd' on 'node1'
CRS-2790: Starting shutdown of Cluster Ready Services-managed resources on 'node1'
CRS-2673: Attempting to stop 'ora.LISTENER_SCAN3.lsnr' on 'node1'
CRS-2673: Attempting to stop 'ora.oc4j' on 'node1'
CRS-2673: Attempting to stop 'ora.cvu' on 'node1'
CRS-2673: Attempting to stop 'ora.LISTENER.lsnr' on 'node1'
CRS-2673: Attempting to stop 'ora.LISTENER_SCAN2.lsnr' on 'node1'
CRS-2673: Attempting to stop 'ora.DSK_GRP_01.dg' on 'node1'
CRS-2677: Stop of 'ora.LISTENER_SCAN2.lsnr' on 'node1' succeeded
CRS-2673: Attempting to stop 'ora.scan2.vip' on 'node1'
CRS-2677: Stop of 'ora.LISTENER_SCAN3.lsnr' on 'node1' succeeded
CRS-2673: Attempting to stop 'ora.scan3.vip' on 'node1'
CRS-2677: Stop of 'ora.LISTENER.lsnr' on 'node1' succeeded
CRS-2673: Attempting to stop 'ora.node1.vip' on 'node1'
CRS-2677: Stop of 'ora.node1.vip' on 'node1' succeeded
CRS-2672: Attempting to start 'ora.node1.vip' on 'node2'
CRS-2677: Stop of 'ora.scan3.vip' on 'node1' succeeded
CRS-2672: Attempting to start 'ora.scan3.vip' on 'node2'
CRS-2677: Stop of 'ora.scan2.vip' on 'node1' succeeded
CRS-2672: Attempting to start 'ora.scan2.vip' on 'node2'
CRS-2676: Start of 'ora.node1.vip' on 'node2' succeeded
CRS-2676: Start of 'ora.scan2.vip' on 'node2' succeeded
CRS-2676: Start of 'ora.scan3.vip' on 'node2' succeeded
CRS-2672: Attempting to start 'ora.LISTENER_SCAN2.lsnr' on 'node2'
CRS-2672: Attempting to start 'ora.LISTENER_SCAN3.lsnr' on 'node2'
CRS-2676: Start of 'ora.LISTENER_SCAN2.lsnr' on 'node2' succeeded
CRS-2676: Start of 'ora.LISTENER_SCAN3.lsnr' on 'node2' succeeded
CRS-2677: Stop of 'ora.oc4j' on 'node1' succeeded
CRS-2672: Attempting to start 'ora.oc4j' on 'node2'
CRS-2677: Stop of 'ora.cvu' on 'node1' succeeded
CRS-2672: Attempting to start 'ora.cvu' on 'node2'
CRS-2676: Start of 'ora.cvu' on 'node2' succeeded
CRS-2676: Start of 'ora.oc4j' on 'node2' succeeded
CRS-2677: Stop of 'ora.DSK_GRP_01.dg' on 'node1' succeeded
CRS-2673: Attempting to stop 'ora.asm' on 'node1'
CRS-2677: Stop of 'ora.asm' on 'node1' succeeded
CRS-2673: Attempting to stop 'ora.ons' on 'node1'
CRS-2677: Stop of 'ora.ons' on 'node1' succeeded
CRS-2673: Attempting to stop 'ora.net1.network' on 'node1'
CRS-2677: Stop of 'ora.net1.network' on 'node1' succeeded
CRS-2792: Shutdown of Cluster Ready Services-managed resources on 'node1' has completed
CRS-2677: Stop of 'ora.crsd' on 'node1' succeeded
CRS-2673: Attempting to stop 'ora.ctssd' on 'node1'
CRS-2673: Attempting to stop 'ora.evmd' on 'node1'
CRS-2673: Attempting to stop 'ora.asm' on 'node1'
CRS-2673: Attempting to stop 'ora.mdnsd' on 'node1'
CRS-2677: Stop of 'ora.evmd' on 'node1' succeeded
CRS-2677: Stop of 'ora.mdnsd' on 'node1' succeeded
CRS-2677: Stop of 'ora.ctssd' on 'node1' succeeded
CRS-2677: Stop of 'ora.asm' on 'node1' succeeded
CRS-2673: Attempting to stop 'ora.cluster_interconnect.haip' on 'node1'
CRS-2677: Stop of 'ora.cluster_interconnect.haip' on 'node1' succeeded
CRS-2673: Attempting to stop 'ora.cssd' on 'node1'
CRS-2677: Stop of 'ora.cssd' on 'node1' succeeded
CRS-2673: Attempting to stop 'ora.gipcd' on 'node1'
CRS-2677: Stop of 'ora.gipcd' on 'node1' succeeded
CRS-2673: Attempting to stop 'ora.gpnpd' on 'node1'
CRS-2677: Stop of 'ora.gpnpd' on 'node1' succeeded
CRS-2793: Shutdown of Oracle High Availability Services-managed resources on 'node1' has completed
CRS-4133: Oracle High Availability Services has been stopped.
Shutdown the node:
[root@node1 oracle]# init 0