About Me

Database and GIS Consultant.

Sunday, May 31, 2020

Manually Install Oracle Spatial in Oracle 12c R2 Container Database


Manually Install Oracle Spatial in Oracle 12c Container Database 

Purpose: Manually Install Oracle Spatial in Oracle 12c Database in a Container / Pluggable Database.


Environment:

Database Software: Oracle 12c Release 2

Operating System: Windows Server 2012 R2 Standard - 64 Bit


Prerequisites: Already created a basic (container) database without any bells and whistles. A container database (with a ROOT and SEED PDBs) and created dictionary views and system stored procedures by running catcdb.sql, refer to my previous post.


Oracle spatial depends on other Oracle components (Oracle Java, Multimedia and Oracle XML Database), since XDB (Oracle XML Database) comes integrated with the core Oracle database, I will focus on installing Java and Multimedia.


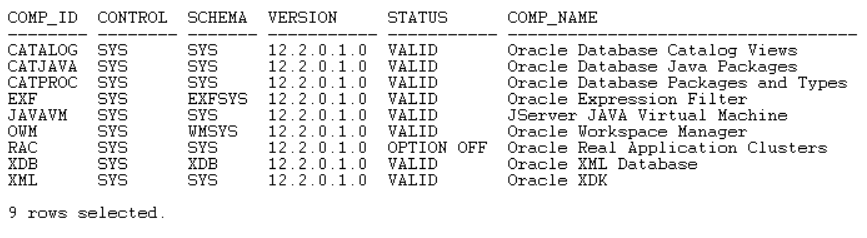
List of components in my database before I start: -


SQL> select comp_id, control, schema, version, status, comp_name from dba_registry order by 1;


Step # 1: Install Java


Open a windows command prompt, set the environment variables (Make sure Oracle Home and Perl path is present).


> set ORACLE_SID=BABCDB


> set ORACLE_HOME=C:\Oracle12cR2_64Bit_DB\product


> set Path=C:\Oracle12cR2_64Bit_DB\product\bin;C:\Oracle12cR2_64Bit_DB\product\perl\bin;C:\Program Files (x86)\Common Files\Oracle\Java\javapath; C:\WINDOWS\system32;C:\WINDOWS;C:\WINDOWS\System32\...


> cd C:\Oracle12cR2_64Bit_DB\product\rdbms\admin


I created a folder called "C:\tmp\spatial" to direct the message files (like logs, errors) that gets generated while running different scripts during this installation. And the message files will have unique names for each script based on the value I provide for the “-b” parameter in the script.


Step # 1A - INITJVM.SQL


> perl catcon.pl -p 2 -u SYS/********** -l C:\tmp\spatial -b initjvm_install_babu C:\Oracle12cR2_64Bit_DB\product\javavm\install\initjvm.sql


C:\Oracle12cR2_64Bit_DB\product\rdbms\admin>perl catcon.pl -p 2 -u SYS/********** -l C:\tmp\spatial -b initjvm_install_babu C:\Oracle12cR2_64Bit_DB\product\javavm\install\initjvm.sql

catcon: ALL catcon-related output will be written to [C:\tmp\spatial/initjvm_install_babu_catcon_8984.lst]

catcon: See [C:\tmp\spatial/initjvm_install_babu*.log] files for output generated by scripts

catcon: See [C:\tmp\spatial/initjvm_install_babu_*.lst] files for spool files, if any

catcon.pl: completed successfully


Step # 1B - INITXML.SQL


> perl catcon.pl -p 2 -u SYS/********** -l C:\tmp\spatial -b initxml_install_babu C:\Oracle12cR2_64Bit_DB\product\xdk\admin\initxml.sql


C:\Oracle12cR2_64Bit_DB\product\rdbms\admin>perl catcon.pl -p 2 -u SYS/********** -l C:\tmp\spatial -b initxml_install_babu C:\Oracle12cR2_64Bit_DB\product\xdk\admin\initxml.sql

catcon: ALL catcon-related output will be written to [C:\tmp\spatial/initxml_install_babu_catcon_20368.lst]

catcon: See [C:\tmp\spatial/initxml_install_babu*.log] files for output generated by scripts

catcon: See [C:\tmp\spatial/initxml_install_babu_*.lst] files for spool files, if any

catcon.pl: completed successfully


Step # 1C - XMLJA.SQL


> perl catcon.pl -p 2 -u SYS/********** -l C:\tmp\spatial -b xmlja_install_babu C:\Oracle12cR2_64Bit_DB\product\xdk\admin\xmlja.sql


C:\Oracle12cR2_64Bit_DB\product\rdbms\admin>perl catcon.pl -p 2 -u SYS/********** -l C:\tmp\spatial -b xmlja_install_babu C:\Oracle12cR2_64Bit_DB\product\xdk\admin\xmlja.sql

catcon: ALL catcon-related output will be written to [C:\tmp\spatial/xmlja_install_babu_catcon_12644.lst]

catcon: See [C:\tmp\spatial/xmlja_install_babu*.log] files for output generated by scripts

catcon: See [C:\tmp\spatial/xmlja_install_babu_*.lst] files for spool files, if any

catcon.pl: completed successfully


Step # 1D - CATJAVA.SQL


> perl catcon.pl -p 2 -u SYS/********** -l C:\tmp\spatial -b catjava_install_babu C:\Oracle12cR2_64Bit_DB\product\rdbms\admin\catjava.sql


C:\Oracle12cR2_64Bit_DB\product\rdbms\admin>perl catcon.pl -p 2 -u SYS/********** -l C:\tmp\spatial -b catjava_install_babu C:\Oracle12cR2_64Bit_DB\product\rdbms\admin\catjava.sql

catcon: ALL catcon-related output will be written to [C:\tmp\spatial/catjava_install_babu_catcon_276.lst]

catcon: See [C:\tmp\spatial/catjava_install_babu*.log] files for output generated by scripts

catcon: See [C:\tmp\spatial/catjava_install_babu_*.lst] files for spool files, if any

catcon.pl: completed successfully


Step # 1E- CATEXF.SQL


> perl catcon.pl -p 2 -u SYS/********** -l C:\tmp\spatial -b catexf_install_babu C:\Oracle12cR2_64Bit_DB\product\rdbms\admin\catexf.sql


C:\Oracle12cR2_64Bit_DB\product\rdbms\admin>perl catcon.pl -p 2 -u SYS/********** -l C:\tmp\spatial -b catexf_install_babu C:\Oracle12cR2_64Bit_DB\product\rdbms\admin\catexf.sql

catcon: ALL catcon-related output will be written to [C:\tmp\spatial/catexf_install_babu_catcon_21300.lst]

catcon: See [C:\tmp\spatial/catexf_install_babu*.log] files for output generated by scripts

catcon: See [C:\tmp\spatial/catexf_install_babu_*.lst] files for spool files, if any

catcon.pl: completed successfully


SQL> select comp_id, control, schema, version, status, comp_name from dba_registry order by 1;


SQL> SELECT TABLESPACE_NAME,BYTES/1024/1024 "BYTES_MB",MAXBYTES/1024/1024 "MAX_BYTES_MB" FROM DBA_DATA_FILES order by TABLESPACE_NAME;


I will use SYSAUX tablespace for both (Multimedia and Spatial) as per Oracle's recommendation.


Step # 2A - ORDINST.SQL


> perl catcon.pl -p 2 -u SYS/********** -l C:\tmp\spatial -b ordinst_install_babu -a 1 C:\Oracle12cR2_64Bit_DB\product\ord\admin\ordinst.sql 1SYSAUX 1SYSAUX


C:\Oracle12cR2_64Bit_DB\product\rdbms\admin>perl catcon.pl -p 2 -u SYS/********** -l C:\tmp\spatial -b ordinst_install_babu -a 1 C:\Oracle12cR2_64Bit_DB\product\ord\admin\ordinst.sql 1SYSAUX 1SYSAUX

catcon: ALL catcon-related output will be written to [C:\tmp\spatial/ordinst_install_babu_catcon_20516.lst]

catcon: See [C:\tmp\spatial/ordinst_install_babu*.log] files for output generated by scripts

catcon: See [C:\tmp\spatial/ordinst_install_babu_*.lst] files for spool files, if any

catcon.pl: completed successfully


Step # 2A - CATIM.SQL


> perl catcon.pl -p 2 -u SYS/********** -l C:\tmp\spatial -b catim_install_babu C:\Oracle12cR2_64Bit_DB\product\ord\im\admin\catim.sql


C:\Oracle12cR2_64Bit_DB\product\rdbms\admin>perl catcon.pl -p 2 -u SYS/********** -l C:\tmp\spatial -b catim_install_babu C:\Oracle12cR2_64Bit_DB\product\ord\im\admin\catim.sql

catcon: ALL catcon-related output will be written to [C:\tmp\spatial/catim_install_babu_catcon_3020.lst]

catcon: See [C:\tmp\spatial/catim_install_babu*.log] files for output generated by scripts

catcon: See [C:\tmp\spatial/catim_install_babu_*.lst] files for spool files, if any

catcon.pl: completed successfully


SQL> set serverout on

SQL> execute validate_ordim;

Locator INVALID OBJECTS: /252088c1_ElocationPartitionpa - INVALID - JAVA CLASS

Locator INVALID OBJECTS: /296aa566_TrafficTimezoneUserD - INVALID - JAVA CLASS

Locator INVALID OBJECTS: /3d173f4c_TrafficDataValidator - INVALID - JAVA CLASS

Locator INVALID OBJECTS: /540dac42_ElocationPartition - INVALID - JAVA CLASS

Locator INVALID OBJECTS: /67a1229a_NDMTrafficWrapper - INVALID - JAVA CLASS

Locator INVALID OBJECTS: /b3a13448_TrafficUserDataGener - INVALID - JAVA CLASS

Locator INVALID OBJECTS: /d7dbd798_TrafficUserDataGener - INVALID - JAVA CLASS

Locator INVALID OBJECTS: /dbeb7075_TrafficUserDataGener - INVALID - JAVA CLASS


PL/SQL procedure successfully completed.

select comp_id, control, schema, version, status, comp_name from dba_registry order by 1;


SQL> @C:\Oracle12cR2_64Bit_DB\product\rdbms\admin\utlrp.sql

SQL> select comp_id, control, schema, version, status, comp_name from dba_registry order by 1;


SQL> exit;


Step # 3: Installing Oracle Spatial


Step # 3A - MDPRIVS.SQL

> perl catcon.pl -p 2 -u SYS/********** -l C:\tmp\spatial -b mdprivs_install_babu C:\Oracle12cR2_64Bit_DB\product\md\admin\mdprivs.sql


C:\Oracle12cR2_64Bit_DB\product\rdbms\admin>perl catcon.pl -p 2 -u SYS/********** -l C:\tmp\spatial -b mdprivs_install_b

abu C:\Oracle12cR2_64Bit_DB\product\md\admin\mdprivs.sql

catcon: ALL catcon-related output will be written to [C:\tmp\spatial/mdprivs_install_babu_catcon_16008.lst]

catcon: See [C:\tmp\spatial/mdprivs_install_babu*.log] files for output generated by scripts

catcon: See [C:\tmp\spatial/mdprivs_install_babu_*.lst] files for spool files, if any

catcon.pl: completed successfully


Step # 2B - MDINST.SQL

 > perl catcon.pl -p 2 -u SYS/********** -l C:\tmp\spatial -b mdinst_install_babu C:\Oracle12cR2_64Bit_DB\product\md\admin\mdinst.sql


C:\Oracle12cR2_64Bit_DB\product\rdbms\admin>perl catcon.pl -p 2 -u SYS/********** -l C:\tmp\spatial -b mdinst_install_babu C:\Oracle12cR2_64Bit_DB\product\md\admin\mdinst.sql

catcon: ALL catcon-related output will be written to [C:\tmp\spatial/mdinst_install_babu_catcon_18640.lst]

catcon: See [C:\tmp\spatial/mdinst_install_babu*.log] files for output generated by scripts

catcon: See [C:\tmp\spatial/mdinst_install_babu_*.lst] files for spool files, if any

catcon.pl: completed successfully


SQL> select comp_id, control, schema, version, status, comp_name from dba_registry order by 1;


SQL> SELECT TABLESPACE_NAME,BYTES/1024/1024 "BYTES_MB",MAXBYTES/1024/1024 "MAX_BYTES_MB" FROM DBA_DATA_FILES order by TABLESPACE_NAME;


Conclusion: These components not only got installed in ROOT PDB, but also in the SEED PDB, so future PDBs created using this SEED will inherit all the components installed so far. 


Tuesday, May 26, 2020

How to Install Oracle Patch - Basic Steps

Purpose: Basic steps involved in installing an Oracle Bundle Patch (Windows OS)

Environment:
Database Software: Oracle 12c Release 2
Operating System: Windows Server 2012 R2 Standard - 64 Bit
Patch to Install: Oracle Database Patch 30446296, which a Bundle Patch (BP) patch BP 12.2.0.1.200114 (latest available as of date), downloaded from Oracle Support.

Prepare:


1. Download the latest Bundle patch and extract it at a staging area.

Read the "README.html" file that comes along with the patch. The "Prerequisites" says that "You must use the OPatch utility version 12.2.0.1.7 or later to apply this patch. Oracle recommends that you usethe latest released OPatch 12.2, which is available for download from My Oracle Support patch 6880880 by selecting the 12.2.0.1.0 release."

Install


2: Check the existing OPatch version that came as part of the 12cR2 base release:-

set ORACLE_HOME=C:\Oracle12cR2_64Bit_DB\product
set Path=C:\Oracle12cR2_64Bit_DB\product\bin;C:\Oracle12cR2_64Bit_DB\product\OPatch;C:\Program Files (x86)\

C:\> opatch version
OPatch Version: 12.2.0.1.6

OPatch succeeded.

3. Download and Copy new OPatch

I have an older version, which means I need to download OPatch 12.2.0.1.7 or later, so I again downloaded OPatch 12.2.0.1.21 (Patch 6880880) from Oracle Support and extracted it at a staging area (E:\Ora_Patch_Stage\OP_p6880880\OPatch).

Backup the existing OPatch, just in case.

xcopy /E /I C:\Oracle12cR2_64Bit_DB\product\OPatch C:\Oracle12cR2_64Bit_DB\product\OPatch_BKP

Delete the old OPatch folder

rmdir /s /q C:\Oracle12cR2_64Bit_DB\product\OPatch

Copy over the downloaded OPatch folder to the Oracle Home.

xcopy /E /I E:\Ora_Patch_Stage\OP_p6880880\OPatch C:\Oracle12cR2_64Bit_DB\product\OPatch
Check the OPatch version again:-

C:\>opatch version
OPatch Version: 12.2.0.1.21

OPatch succeeded.


Which meets the Prerequisites, so let’s proceed with installing the Oracle Bundle Patch.

4: Install the Oracle Bundle Database Bundle Patch
 

Navigate to the location where its extracted and install

E:
cd E:\Ora_Patch_Stage\BP_p30446296\30446296
cd E:\Ora_Patch_Stage\BP_p30446296\30446296\opatch apply

Verify


5. Verify the install status by checking the OPatch logs at 

"C:\Program Files\Oracle\Inventory\logs
"ORACLE_HOME\cfgtoollogs\opatch"

You can also check what patches have been installed by

C:\> opatch lsinventory


Sunday, May 24, 2020

Manually Creating an Oracle 12c R2 Container Database on Windows OS

Purpose: Manually Create an Oracle Container Database using SQL*Plus command prompt on Windows OS

Environment:
Database Software: Oracle 12c Release 2
Operating System: Windows Server 2012 R2 Standard - 64 Bit

1. Oracle Install: Already installed Oracle 12c Release 2 software as per my previous post.

Tip # 1: If you plan on using this install for more serious stuff (business purposes), its highly recommended to apply the latest available patch(es). Refer to my post on Installing Oracle Patch.

2. Oracle Net: Configure listener.ora, tnsnames.ora and sqlnet.ora files at "F:\Oracle12c_64Bit_DB\product\network\admin" folder with my typical settings:-

listener.ora :-

DEFAULT_SERVICE_LISTENER = BABCDB

INBOUND_CONNECT_TIMEOUT_LISTENER = 0

SID_LIST_LISTENER =
(SID_LIST =
(SID_DESC =
(SID_NAME = PLSExtProc)
(ORACLE_HOME = F:\Oracle12c_64Bit_DB\product)
(PROGRAM = extproc))
(SID_DESC =
(GLOBAL_DBNAME = BABCDB)
(ORACLE_HOME = F:\Oracle12cR2_64Bit_DB\product)
(SID_NAME = BABCDB)))

LISTENER =
(DESCRIPTION_LIST =
(DESCRIPTION =
(ADDRESS = (PROTOCOL = TCP)(HOST = SANDBOX26)(PORT = 1521))))

tnsnames.ora :-

BABCDB =
(DESCRIPTION =
(ADDRESS_LIST =
(ADDRESS = (PROTOCOL = TCP)(HOST = SANDBOX26)(PORT = 1521)))
(CONNECT_DATA =
(SERVER = DEDICATED)
(SERVICE_NAME = BABCDB)))

sqlnet.ora :-

SQLNET.INBOUND_CONNECT_TIMEOUT = 0
SQLNET.EXPIRE_TIME = 2
NAMES.DIRECTORY_PATH= (TNSNAMES, EZCONNECT)

3. DB Parameter [Init] File: Added below parameters in the initBABCDB.ora file and placed it at "F:\Oracle12c_64Bit_DB\product\database" folder:-

audit_file_dest='F:\Oracle12cR2_64Bit_DB\admin\adump'
audit_trail =none
compatible='12.0.0.0.0'
control_files='H:\ORACLE\ORADATA\BABCDB\control01.ctl','H:\ORACLE\ORADATA\BABCDB\control02.ctl','H:\ORACLE\ORADATA\BABCDB\control03.ctl'
db_block_size=8192
db_cache_size=157286400
db_domain=''
db_file_multiblock_read_count=16
db_name='BABCDB'
db_recovery_file_dest='F:\Oracle12cR2_64Bit_DB\admin\fast_recovery_area'
db_recovery_file_dest_size=2G
diagnostic_dest='F:\Oracle12cR2_64Bit_DB\admin\diagnostic_dest'
dispatchers='(PROTOCOL=TCP) (SERVICE=BABCDBXDB)'
enable_pluggable_database=true
fast_start_mttr_target=300
java_pool_size=157286400
job_queue_processes=10
large_pool_size=67108864
local_listener='LISTENER_BABCDB'
open_cursors=2000
pga_aggregate_limit=2147483648
pga_aggregate_target=104857600
processes=500
query_rewrite_enabled='TRUE'
remote_login_passwordfile='EXCLUSIVE'
session_cached_cursors=50
sga_max_size=629145600
shared_pool_size=692060160
sort_area_size=524288
star_transformation_enabled='FALSE'
streams_pool_size=50331648
timed_statistics=TRUE
undo_management='AUTO'
undo_retention=10800
undo_tablespace='UNDOTBS1'

4. Destination / Location Folders: Create folders for

audit_file_dest
db_recovery_file_dest
diagnostic_dest
control_files
datafiles and PDB seed

5. Create Oracle Service: Navigate to the bin folder, run oradim and when asked, provide the password of the local OS user that was created in the previous post.

cd F:\Oracle12cR2_64Bit_DB\product\bin

oradim -new -SID BABCDB -INTPWD xxxxxxxx -STARTMODE m -PFILE F:\Oracle12cR2_64Bit_DB\product\database\initBABCDB.ora
Enter password for Oracle service user: [provide password for OracleWinUsr user]
Instance created.

Note, the created service's start mode is manual, but its started right after creation. If not, make sure the Oracle service OracleServiceBABCDB is started.

6. Start the listener and mount the database:-

> cd F:\Oracle12cR2_64Bit_DB\product\bin

> lsnrctl start

> sqlplus SYS/xxxxxxxxxx@BABCDB AS SYSDBA

SQL> startup nomount

7. Create the (container) database:-

SQL> CREATE DATABASE BABCDB
USER SYS IDENTIFIED BY xxxxxxxxx
USER SYSTEM IDENTIFIED BY xxxxxxxxx
CONTROLFILE REUSE
LOGFILE
GROUP 1 ('H:\ORACLE\ORADATA\BABCDB\REDO_01.LOG') SIZE 100M REUSE,
GROUP 2 ('H:\ORACLE\ORADATA\BABCDB\REDO_02.LOG') SIZE 100M REUSE,
GROUP 3 ('H:\ORACLE\ORADATA\BABCDB\REDO_03.LOG') SIZE 100M REUSE
MAXLOGFILES 32
MAXLOGMEMBERS 4
MAXLOGHISTORY 100
MAXDATAFILES 254
MAXINSTANCES 1
EXTENT MANAGEMENT LOCAL
DATAFILE 'H:\ORACLE\ORADATA\BABCDB\SYSTEM_01.DBF' SIZE 300M REUSE AUTOEXTEND ON NEXT 5M MAXSIZE 2048m
SYSAUX DATAFILE 'H:\ORACLE\ORADATA\BABCDB\SYSAUX_01.DBF' SIZE 120M REUSE AUTOEXTEND ON NEXT 5M MAXSIZE 2048m
DEFAULT TABLESPACE DEFAULTBS1
DATAFILE 'H:\ORACLE\ORADATA\BABCDB\DEFAULT_01.DBF' SIZE 50M REUSE AUTOEXTEND ON NEXT 5M MAXSIZE 2048m
UNDO TABLESPACE UNDOTBS1
DATAFILE 'H:\ORACLE\ORADATA\BABCDB\UNDO_01.DBF' SIZE 200M REUSE AUTOEXTEND ON NEXT 5M MAXSIZE 4096m
DEFAULT TEMPORARY TABLESPACE TEMPTBS1
TEMPFILE 'H:\ORACLE\ORADATA\BABCDB\TEMP_01.DBF' SIZE 25M REUSE AUTOEXTEND on NEXT 1m MAXSIZE 4096m
UNIFORM SIZE 1M
CHARACTER SET WE8MSWIN1252
NATIONAL CHARACTER SET AL16UTF16
NOARCHIVELOG
ENABLE PLUGGABLE DATABASE
SEED
FILE_NAME_CONVERT = ('H:\ORACLE\ORADATA\BABCDB\','H:\ORACLE\ORADATA\BABCDB\SEEDPDB\')
SYSTEM DATAFILES SIZE 50M AUTOEXTEND ON NEXT 10M MAXSIZE 2048m
SYSAUX DATAFILES SIZE 50M
LOCAL UNDO OFF;

8. Create the dictionary views and system stored procedures

I created a folder called "C:\tmp\spatial" to direct the output files while running the catcdb.sql script.

This is done by running "catcdb.sql", which calls a perl script "catcdb.pl", both these files are located in "ORACLE_HOME\rdbms\admin" folder.

Tip # 2Can't locate util.pm bug - Check this out.
Tip # 3: SP2-0640: Not connected error message - Check this out.

> set ORACLE_SID=BABCDB

> set ORACLE_HOME=F:\Oracle12cR2_64Bit_DB\product
> set PATH=F:\Oracle12cR2_64Bit_DB\product\bin;F:\Oracle12cR2_64Bit_DB\product\perl\bin;C:\Program Files\EMC NetWorker\nsr\bin;C:\Windows\system32;C:\Windows;C:\Windows\System32\Wbem;C:\Windows\System32\WindowsPowerShell\v1.0\

Get back to SQL*Plus and run "catcdb.sql" once again.

> sqlplus SYS/xxxxxxxxxx@BABCDB AS SYSDBA

SQL> @F:\Oracle12cR2_64Bit_DB\product\rdbms\admin\catcdb.sql

SQL> host perl -I &&rdbms_admin &&rdbms_admin_catcdb --logDirectory &&1 --logFilename &&2

Enter value for 1: C:\temp\catcdb [Location for log file]
Enter value for 2: BABU_CATCDB.LOG [Name of the log file]
Enter new password for SYS: ********
Enter new password for SYSTEM: ********
Enter temporary tablespace name: TEMPTBS1

9. Verify the log files at the provided location to confirm successful run or any errors. And query DBA_REGISTRY for components and its validity.

select comp_id, control, schema, version, status, comp_name from dba_registry order by 1;

DBA_REGISTRY


Manually Installing Oracle Database Software in Silent Mode using Response File on Windows OS

Purpose: Manually Installing Oracle Database Software in Silent Mode using Response File on Windows OS

Environment:
Database Software: Oracle 12c Release 2
Operating System: Windows Server 2012 R2 Standard - 64 Bit

Preparation:-

1. Download the oracle software and extract it in a temporary folder [C:\Tmp\database]

2. I chose to create a local windows, user not part of any group (for now), and used it (in the response file) for my installation


3. Created a folder for ORACLE_BASE

4. Created a response file called "db_resp_12cR2_simple.rsp" with below parameters:-

DECLINE_SECURITY_UPDATES=true
ORACLE_BASE=F:\Oracle12cR2_64Bit_DB
ORACLE_HOME=F:\Oracle12cR2_64Bit_DB\product
SECURITY_UPDATES_VIA_MYORACLESUPPORT=false
oracle.install.OracleHomeUserName=OracleWinUsr
oracle.install.OracleHomeUserPassword=xxxxxxxxxxx
oracle.install.db.ConfigureAsContainerDB=false
oracle.install.db.InstallEdition=EE
oracle.install.db.isRACOneInstall=false
oracle.install.option=INSTALL_DB_SWONLY
oracle.install.responseFileVersion=/oracle/install/rspfmt_dbinstall_response_schema_v12.2.0


Install:- 

5. Open command prompt as Administrator, navigate to the extracted folder where setup.exe is located and start the installation


cd C:\Tmp\database\

setup.exe -silent -noConsole -skipPrereqs -noconfig -waitForCompletion -responsefile C:\Tmp\db_resp\db_resp_12cR2_simple.rsp


Once above setup.exe command is executed, the cursor control will come back to the command line.

Verify:- 

6. The install status and progress can be found in the log files at “C:\Program Files\Oracle\Inventory\logs” like:-
installActions.log
oraInstall.err
oraInstall.out
silentInstall.log


For example, in my installActions.log it gave below message in the last section:-

*** End of Installation Page***
The installation of Oracle Database 12c was successful.


In my silentInstall.log it had below message:-

silentInstall.log
The installation of Oracle Database 12c was successful.