About Me

Database and GIS Consultant.
Showing posts with label Oracle. Show all posts

Monday, October 19, 2020

Python - Esri's ArcPy - Using Where_Clause - Examples

Environment: ArcCatalog 10.5.1, Oracle GDB, Python 2.7, Esri's ArcPy module


Examples of using where clause ("where_cls")

Example # 1: Create a blank feature class at the destination with the same structure as source. So I use a non-matching condition (-1), so a blank feature class is created:-


import arcpy

out_loc = r"C:\SDE_Connections\SCOTT@TODB.sde"
in_fc = r"C:\SDE_Connections\SCOTT@FROMDB.sde\TEST_FC"
out_fc = "TEST_FC"

C_Field = arcpy.AddFieldDelimiters(in_fc, "ID")
where_cls = C_Field + "= -1"
arcpy.FeatureClassToFeatureClass_conversion(in_fc, out_loc, out_fc, where_cls, config_keyword="VECTOR_DB")


Example # 2: Create a feature class whose column values has a length of only 5 characters from the source.


import arcpy

out_loc = r"C:\SDE_Connections\SCOTT@TODB.sde"
in_fc = r"C:\SDE_Connections\SCOTT@FROMDB.sde\TEST_FC"
out_fc = "TEST_FC"

C_Field = arcpy.AddFieldDelimiters(in_fc, "POSTCODE")where_cls = "char_length("+C_Field+") = 5"

arcpy.FeatureClassToFeatureClass_conversion(in_fc, out_loc, out_fc, where_cls)

Hope it helps ! 

Tuesday, September 8, 2020

Null or Invalid User has Administrative Privileges INS-32095 PRCZ-1101 WSE-000012

Environment:

Database Software: Oracle 12c Release 2

Operating System: Windows Server 2012 R2 Standard - 64 Bit


C:\> setup.exe -silent -noConsole -skipPrereqs -noconfig -waitForCompletion -responsefile resp_12cR2.rsp 


Problem: While running above "setup.exe" command, getting below said messages (in the files in "C:\Program Files\Oracle\Inventory\logs" folder) while manually installing Oracle database Software in silent mode using a response file:-


installActions*.log

SEVERE: [FATAL] [INS-32095] Specified user has administrative privileges.

   CAUSE: You have selected a user which has administrative privileges to be the Oracle Home user.

   ACTION: Make sure you specify a non-administrative user or revoke the administrative privileges for this user.

INFO: Advice is ABORT

INFO: Adding ExitStatus INVALID_USER_INPUT to the exit status set

INFO: Completed validating state <getWindowsSecureOptionDetails>

INFO: Terminating all background operations

INFO: Terminated all background operations

INFO: Finding the most appropriate exit status for the current application

INFO: Exit Status is -2

INFO: Shutdown Oracle Database 12c Release 2 Installer

INFO: Unloading Setup Driver


oraInstall*.err

PRCZ-1101 : failed to determine if user "OracleWinUsr" is a Windows Group Managed Service Account (GMSA) user

WSE-000012: Null or invalid User name parameter.


oraInstall*.out

[FATAL] [INS-32095] Specified user has administrative privileges.

   CAUSE: You have selected a user which has administrative privileges to be the Oracle Home user.

   ACTION: Make sure you specify a non-administrative user or revoke the administrative privileges for this user.


Solution: Check if the user name provided for "oracle.install.OracleHomeUserName" in the response file is a member of "Administrators" group, if so, remove it from that group and continue with the install, which should work. Once the install is over, you may add back the user to be part of "Administrators" group.


Hope if helps!

Saturday, August 22, 2020

Migrate Oracle database from On-Premises to Autonomous Database (ADB) Cloud

Migrate Oracle database from On-Premises to Autonomous Database (ADB) Cloud using Oracle Data Pump


Objective: Migrate a schema from On-Premises Oracle Database to Oracle Autonomous Databases on Cloud using Data Pump


Environments: 

Destination DB: Oracle Autonomous Databases (ADB) on Cloud

Oracle Database 19c Enterprise Edition Release 19.0.0.0.0 - Production [Version 19.5.0.0.0]

Transaction Processing / Shared Infrastructure / Always Free configuration


Source DB: On-Premises, Windows 10, 64 Bit.

Oracle Database 18c Express Edition Release 18.0.0.0.0 - Production [Version 18.4.0.0.0]

I have already configured Oracle Net from my PC to connect to the ADB as per my previous post.


Step 1: Create and prepare sample schema at source DB 

Create a user called "BABUR" and some sample objects, so we can migrate this schema. 

@> conn sys/xxxxxxxx@XE as sysdba
Connected.

SYS@XE> ALTER SESSION SET CONTAINER = SDEDB;

Session altered.

create user BABUR identified by xxxxxxxx 
quota UNLIMITED on USERTBS1
default tablespace USERTBS1
CONTAINER=CURRENT;

GRANT 
CREATE VIEW, 
CREATE TABLE, 
CREATE SESSION, 
CREATE TRIGGER, 
CREATE SEQUENCE 
to BABUR;

CREATE DIRECTORY DATA_PUMP_DIR_SDE as 'C:\tmp\ADB_Exp';

GRANT READ,WRITE ON DIRECTORY DATA_PUMP_DIR_SDE TO BABUR;

CONN BABUR/xxxxxxxx@SDEDB

CREATE TABLE TEST_TAB (A NUMBER);

BEGIN
FOR X IN 1..100 LOOP
INSERT INTO TEST_TAB VALUES (X);
END LOOP;
COMMIT;
END;
/

CREATE INDEX TEST_IDX ON TEST_TAB(A);

CREATE VIEW TEST_VIEW AS SELECT * FROM TEST_TAB WHERE A > 50;

select object_name,object_type from user_objects order by 1;

OBJECT_NAME                    OBJECT_TYPE
------------------------------ -----------------------
TEST_IDX                       INDEX
TEST_TAB                       TABLE
TEST_VIEW                      VIEW

Step 2: Export the Schema using Oracle Data Pump 

Created an export parameter file called "BABUR_DP_PAR_EXP.par" with below content:-

schemas=BABUR
directory=DATA_PUMP_DIR_SDE
dumpfile=BABUR.dmp 
logfile=BABUR_DP_PAR_EXP.log 
exclude=GRANT,STATISTICS,SYSTEM_GRANT,ROLE_GRANT,DEFAULT_ROLE,TABLESPACE_QUOTA,USER,PRE_SCHEMA

Run the data pump export using the parameter file:- 

expdp "BABUR/xxxxxx@SDEDB" parfile=C:\tmp\ADB_Exp\BABUR_DP_PAR_EXP.par


Step 3: Upload the exported dump file.

In the Oracle Cloud Infrastructure Console, create a Bucket in the Object Storage and upload the dump file within that bucket:-


I have created a bucket called "BUCKETB", uploaded the exported dump file "BABUR.dmp" in the bucket and get the Object Details.


Note down the URL Path (URI), we will use it to run the data pump import:-
https://objectstorage.us-ashburn-1.oraclecloud.com/n/id0yw/b/BUCKETB/o/BABUR.DMP

Step 4: Generate Token

Auth Tokens are Oracle-generated token strings that is associated with Oracle Cloud Infrastructure username. We will create credential object with the Auth Token strings as password. The credential object will be used to run Oracle data pump import.

In the Oracle Cloud Infrastructure Console, Go to Identity --> Users --> your username  (the one that is not federated) 


On the left hand side, click on “Auth Tokens”. Create a new token by click on “Generate Token”. 


Note down the random generated value, which will be used as credential password in DBMS_CLOUD. Lets say, mine is "My_Token_Password"

Step 5: Create Credential  Object at ADB

conn admin/xxxxxxxx@tp01_low

ADMIN@tp01_low> select * from USER_CREDENTIALS;

no rows selected

BEGIN
  DBMS_CLOUD.CREATE_CREDENTIAL(
    credential_name => 'BABU_CRED',
    username => 'baburxxxxxy@hotmail.com',
    password => 'My_Token_Password'
  );
END;
/

COL CREDENTIAL_NAME FOR A15
COL ENABLED FOR A10
SET LINES 150
select CREDENTIAL_NAME,ENABLED from USER_CREDENTIALS;

CREDENTIAL_NAME ENABLED
--------------- ----------
BABU_CRED       TRUE

Step 6: Create DB User at Destination (ADB)

Create a user called "DABUR"

create user DABUR identified by xxxxxxxxx quota 100m on DATA;

GRANT 
CREATE VIEW, 
CREATE TABLE, 
CREATE SESSION, 
CREATE TRIGGER, 
CREATE SEQUENCE 
to DABUR;

Step 7: Run Data Pump import as ADB admin user.

The data pump import can be run from any external environment where Oracle client and ADB connections are configured and compatible. I am running this from the source database environment.

Created an import parameter file called "BABUR_DP_PAR_IMP.par" with below content:-

remap_schema=BABUR:DABUR
remap_tablespace=USERTBS1:DATA
directory=data_pump_dir    
credential=BABU_CRED     
dumpfile=https://objectstorage.us-ashburn-1.oraclecloud.com/n/id0yw/b/BUCKETB/o/BABUR.DMP
logfile=DABUR_DP_IMP.log 

Run the data pump import using the parameter file:- 

impdp "admin/xxxx@tp01_low" parfile=C:\tmp\ADB_Exp\DABUR_DP_PAR_IMP.par


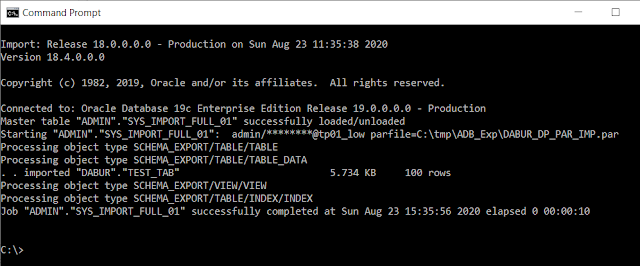
Step 8: Verify the import and Clean up

Check object counts at the destination:-

select object_name,object_type from dba_objects where owner = 'DABUR' order by 1;
 
OBJECT_NAME                    OBJECT_TYPE
------------------------------ -----------------------
TEST_IDX                       INDEX
TEST_TAB                       TABLE
TEST_VIEW                      VIEW

Apparently this simple schema import ran smooth with no errors, but if there were errors that needed to be addressed or recompiled or recreated, you may want to review the (import) log file, which is stored in the ADB server at the "data_pump_dir" directory. Let us see how to retrieve it and later delete it from the ADB server.

Copy the import log from ADB server to cloud Object Storage 

col CREATED for a35
col LAST_MODIFIED for a35
set lines 150

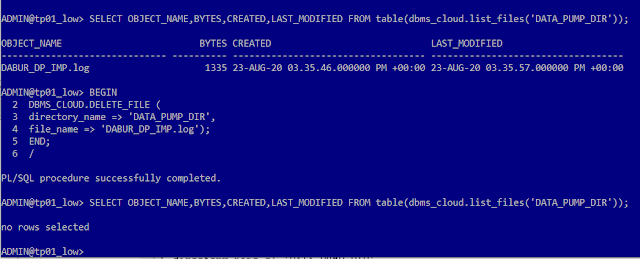
SELECT OBJECT_NAME,BYTES,CREATED,LAST_MODIFIED FROM table(dbms_cloud.list_files('DATA_PUMP_DIR'));

OBJECT_NAME                         BYTES CREATED                             LAST_MODIFIED
------------------------------ ---------- ----------------------------------- -----------------------------------
DABUR_DP_IMP.log                     1335 23-AUG-20 03.35.46.000000 PM +00:00 23-AUG-20 03.35.57.000000 PM +00:00

BEGIN
DBMS_CLOUD.PUT_OBJECT(
credential_name => 'BABU_CRED',
object_uri => 'https://objectstorage.us-ashburn-1.oraclecloud.com/n/id0yw/b/BUCKETB/o/DABUR_DP_IMP_COPY.log',
directory_name => 'DATA_PUMP_DIR',
file_name => 'DABUR_DP_IMP.log');
END;
/

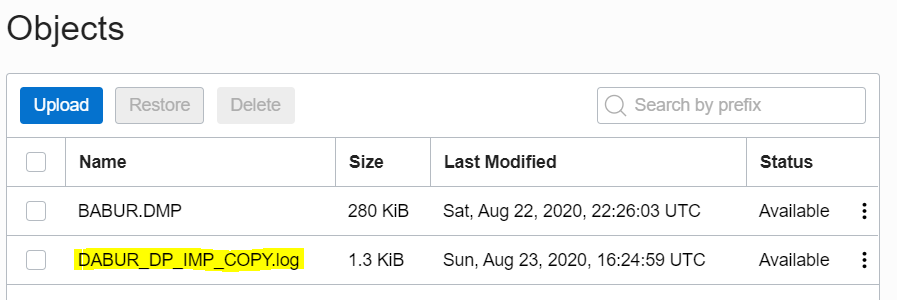
Now you will see the import logfile copy in the Object Storage, which you can download to your PC and examine it.


Once copied to Object Storage, you can delete it from the ADB server / directory:-

BEGIN
DBMS_CLOUD.DELETE_FILE ( 
directory_name => 'DATA_PUMP_DIR',
file_name => 'DABUR_DP_IMP.log');
END;
/


Here we saw how to migrate a schema from an On-Premises Oracle Database to Oracle Autonomous Databases on Cloud using Oracle Data Pump. 

Hope it helps, appreciate your feedback, thanks.

Wednesday, July 29, 2020

Weird Oracle tables (TST_TAB) created by Esri software gets piled up in the RECYCLEBIN

Weird Oracle tables (TST_TAB) created by Esri software gets piled up in the RECYCLEBIN

Environment:  
Esri ArcGIS Desktop Software - ArcCatalog/ArcMap 10.6.1
Oracle 19c [Oracle Autonomous Database (ADB) Cloud]
No Geodatabase present.

Weird tables gets created and then dropped by Esri ArcGIS software products and it remains in the recyclebin. 

Esri software creates and drops a table called TST_TAB every single time when connected from Esri software. You will see it when you query TAB or RECYCLEBIN:-

BABU@cwtp_low> SELECT * FROM TAB;

TNAME                          TABTYPE        CLUSTERID
------------------------------ ------------- ----------
PA_COUNTY_MAP                  TABLE
PA_COUNTY_MAP_N                TABLE
MDRT_9AA2$                     TABLE
MDRT_9AAD$                     TABLE
BIN$q53O51hlUBngU54UAAqFIg==$0 TABLE
BIN$q53IQRxFF3TgU54UAAobLg==$0 TABLE
BIN$q53KQiUKSFjgU54UAAqHjw==$0 TABLE
BIN$q53Yz2etbCXgU54UAAqAQA==$0 TABLE

BABU@cwtp_low> SHOW RECYCLEBIN;
ORIGINAL NAME    RECYCLEBIN NAME                OBJECT TYPE  DROP TIME
---------------- ------------------------------ ------------ -------------------
TST_TAB          BIN$q53Yz2etbCXgU54UAAqAQA==$0 TABLE        2020-07-29:23:23:44
TST_TAB          BIN$q53O51hlUBngU54UAAqFIg==$0 TABLE        2020-07-29:23:20:58
TST_TAB          BIN$q53KQiUKSFjgU54UAAqHjw==$0 TABLE        2020-07-29:23:19:40
TST_TAB          BIN$q53IQRxFF3TgU54UAAobLg==$0 TABLE        2020-07-29:23:19:06

Structure of this table:-

BABU@cwtp_low> DESC "BIN$q53IQRxFF3TgU54UAAobLg==$0"
 Name                       Null?    Type
 -------------------------- -------- -----------
 ID                                  NUMBER(38)
 
Workaround: Not sure if its a bug from Esri products or something else, but the fix that worked for me is to restore one of those tables (or manually create a table with the same name - TST_TAB) and let it sit in the schema. Since the table already exist, new one with the same name cannot be created. And thankfully, the software doesn't drop the table before creating a new one, otherwise, it would have been a nightmare:-

BABU@cwtp_low> flashback table TST_TAB to before drop;

Flashback complete.

BABU@cwtp_low> purge recyclebin;

Recyclebin purged.

BABU@cwtp_low> SELECT * FROM TAB;

TNAME                          TABTYPE        CLUSTERID
------------------------------ ------------- ----------
PA_COUNTY_MAP                  TABLE
PA_COUNTY_MAP_N                TABLE
MDRT_9AA2$                     TABLE
TST_TAB                        TABLE
MDRT_9AAD$                     TABLE

Let me know if you have come across this and how you handled it. Thanks! 

Tuesday, June 2, 2020

Dump contents of Oracle INIT Parameter File

Purpose: Dump the content of init parameter file that was used to start the database or create a copy of parameters and its values that was used to start the database

Environment: Oracle 12cR1 DB, on Windows, using a basic initXXXX.ora at its default location [$ORACLE_HOME\database]

SET FEEDBACK OFF 
SET LINES 190
SET PAGES 1000
COL NAME FOR A160
COL INIT FOR A190

SPOOL C:\TMP\INIT_copy.TXT

select distinct INIT from
(SELECT NAME||' = '''||VALUE||'''' INIT FROM v$system_parameter where ISDEFAULT='FALSE' and TYPE = 2 
UNION ALL
SELECT NAME||' = '||VALUE INIT FROM v$system_parameter where ISDEFAULT='FALSE' and TYPE <> 2)
order by 1;

SPOOL OFF

Init Parameters


Tuesday, May 26, 2020

How to Install Oracle Patch - Basic Steps

Purpose: Basic steps involved in installing an Oracle Bundle Patch (Windows OS)

Environment:
Database Software: Oracle 12c Release 2
Operating System: Windows Server 2012 R2 Standard - 64 Bit
Patch to Install: Oracle Database Patch 30446296, which a Bundle Patch (BP) patch BP 12.2.0.1.200114 (latest available as of date), downloaded from Oracle Support.

Prepare:


1. Download the latest Bundle patch and extract it at a staging area.

Read the "README.html" file that comes along with the patch. The "Prerequisites" says that "You must use the OPatch utility version 12.2.0.1.7 or later to apply this patch. Oracle recommends that you usethe latest released OPatch 12.2, which is available for download from My Oracle Support patch 6880880 by selecting the 12.2.0.1.0 release."

Install


2: Check the existing OPatch version that came as part of the 12cR2 base release:-

set ORACLE_HOME=C:\Oracle12cR2_64Bit_DB\product
set Path=C:\Oracle12cR2_64Bit_DB\product\bin;C:\Oracle12cR2_64Bit_DB\product\OPatch;C:\Program Files (x86)\

C:\> opatch version
OPatch Version: 12.2.0.1.6

OPatch succeeded.

3. Download and Copy new OPatch

I have an older version, which means I need to download OPatch 12.2.0.1.7 or later, so I again downloaded OPatch 12.2.0.1.21 (Patch 6880880) from Oracle Support and extracted it at a staging area (E:\Ora_Patch_Stage\OP_p6880880\OPatch).

Backup the existing OPatch, just in case.

xcopy /E /I C:\Oracle12cR2_64Bit_DB\product\OPatch C:\Oracle12cR2_64Bit_DB\product\OPatch_BKP

Delete the old OPatch folder

rmdir /s /q C:\Oracle12cR2_64Bit_DB\product\OPatch

Copy over the downloaded OPatch folder to the Oracle Home.

xcopy /E /I E:\Ora_Patch_Stage\OP_p6880880\OPatch C:\Oracle12cR2_64Bit_DB\product\OPatch
Check the OPatch version again:-

C:\>opatch version
OPatch Version: 12.2.0.1.21

OPatch succeeded.


Which meets the Prerequisites, so let’s proceed with installing the Oracle Bundle Patch.

4: Install the Oracle Bundle Database Bundle Patch
 

Navigate to the location where its extracted and install

E:
cd E:\Ora_Patch_Stage\BP_p30446296\30446296
cd E:\Ora_Patch_Stage\BP_p30446296\30446296\opatch apply

Verify


5. Verify the install status by checking the OPatch logs at 

"C:\Program Files\Oracle\Inventory\logs
"ORACLE_HOME\cfgtoollogs\opatch"

You can also check what patches have been installed by

C:\> opatch lsinventory