About Me

Database and GIS Consultant.
Showing posts with label 64 Bit. Show all posts

Tuesday, September 8, 2020

Null or Invalid User has Administrative Privileges INS-32095 PRCZ-1101 WSE-000012

Environment:

Database Software: Oracle 12c Release 2

Operating System: Windows Server 2012 R2 Standard - 64 Bit


C:\> setup.exe -silent -noConsole -skipPrereqs -noconfig -waitForCompletion -responsefile resp_12cR2.rsp 


Problem: While running above "setup.exe" command, getting below said messages (in the files in "C:\Program Files\Oracle\Inventory\logs" folder) while manually installing Oracle database Software in silent mode using a response file:-


installActions*.log

SEVERE: [FATAL] [INS-32095] Specified user has administrative privileges.

   CAUSE: You have selected a user which has administrative privileges to be the Oracle Home user.

   ACTION: Make sure you specify a non-administrative user or revoke the administrative privileges for this user.

INFO: Advice is ABORT

INFO: Adding ExitStatus INVALID_USER_INPUT to the exit status set

INFO: Completed validating state <getWindowsSecureOptionDetails>

INFO: Terminating all background operations

INFO: Terminated all background operations

INFO: Finding the most appropriate exit status for the current application

INFO: Exit Status is -2

INFO: Shutdown Oracle Database 12c Release 2 Installer

INFO: Unloading Setup Driver


oraInstall*.err

PRCZ-1101 : failed to determine if user "OracleWinUsr" is a Windows Group Managed Service Account (GMSA) user

WSE-000012: Null or invalid User name parameter.


oraInstall*.out

[FATAL] [INS-32095] Specified user has administrative privileges.

   CAUSE: You have selected a user which has administrative privileges to be the Oracle Home user.

   ACTION: Make sure you specify a non-administrative user or revoke the administrative privileges for this user.


Solution: Check if the user name provided for "oracle.install.OracleHomeUserName" in the response file is a member of "Administrators" group, if so, remove it from that group and continue with the install, which should work. Once the install is over, you may add back the user to be part of "Administrators" group.


Hope if helps!

Saturday, August 22, 2020

Migrate Oracle database from On-Premises to Autonomous Database (ADB) Cloud

Migrate Oracle database from On-Premises to Autonomous Database (ADB) Cloud using Oracle Data Pump


Objective: Migrate a schema from On-Premises Oracle Database to Oracle Autonomous Databases on Cloud using Data Pump


Environments: 

Destination DB: Oracle Autonomous Databases (ADB) on Cloud

Oracle Database 19c Enterprise Edition Release 19.0.0.0.0 - Production [Version 19.5.0.0.0]

Transaction Processing / Shared Infrastructure / Always Free configuration


Source DB: On-Premises, Windows 10, 64 Bit.

Oracle Database 18c Express Edition Release 18.0.0.0.0 - Production [Version 18.4.0.0.0]

I have already configured Oracle Net from my PC to connect to the ADB as per my previous post.


Step 1: Create and prepare sample schema at source DB 

Create a user called "BABUR" and some sample objects, so we can migrate this schema. 

@> conn sys/xxxxxxxx@XE as sysdba
Connected.

SYS@XE> ALTER SESSION SET CONTAINER = SDEDB;

Session altered.

create user BABUR identified by xxxxxxxx 
quota UNLIMITED on USERTBS1
default tablespace USERTBS1
CONTAINER=CURRENT;

GRANT 
CREATE VIEW, 
CREATE TABLE, 
CREATE SESSION, 
CREATE TRIGGER, 
CREATE SEQUENCE 
to BABUR;

CREATE DIRECTORY DATA_PUMP_DIR_SDE as 'C:\tmp\ADB_Exp';

GRANT READ,WRITE ON DIRECTORY DATA_PUMP_DIR_SDE TO BABUR;

CONN BABUR/xxxxxxxx@SDEDB

CREATE TABLE TEST_TAB (A NUMBER);

BEGIN
FOR X IN 1..100 LOOP
INSERT INTO TEST_TAB VALUES (X);
END LOOP;
COMMIT;
END;
/

CREATE INDEX TEST_IDX ON TEST_TAB(A);

CREATE VIEW TEST_VIEW AS SELECT * FROM TEST_TAB WHERE A > 50;

select object_name,object_type from user_objects order by 1;

OBJECT_NAME                    OBJECT_TYPE
------------------------------ -----------------------
TEST_IDX                       INDEX
TEST_TAB                       TABLE
TEST_VIEW                      VIEW

Step 2: Export the Schema using Oracle Data Pump 

Created an export parameter file called "BABUR_DP_PAR_EXP.par" with below content:-

schemas=BABUR
directory=DATA_PUMP_DIR_SDE
dumpfile=BABUR.dmp 
logfile=BABUR_DP_PAR_EXP.log 
exclude=GRANT,STATISTICS,SYSTEM_GRANT,ROLE_GRANT,DEFAULT_ROLE,TABLESPACE_QUOTA,USER,PRE_SCHEMA

Run the data pump export using the parameter file:- 

expdp "BABUR/xxxxxx@SDEDB" parfile=C:\tmp\ADB_Exp\BABUR_DP_PAR_EXP.par


Step 3: Upload the exported dump file.

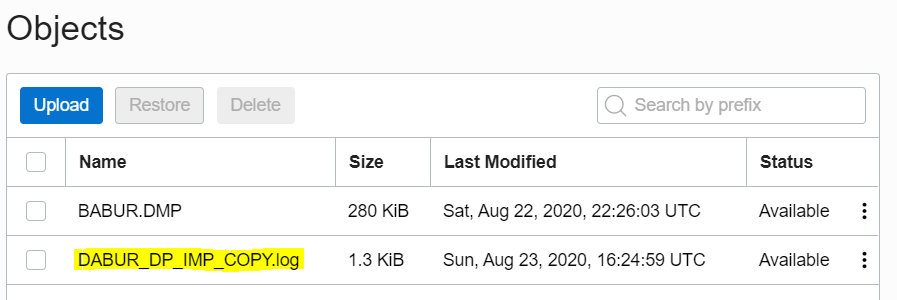
In the Oracle Cloud Infrastructure Console, create a Bucket in the Object Storage and upload the dump file within that bucket:-


I have created a bucket called "BUCKETB", uploaded the exported dump file "BABUR.dmp" in the bucket and get the Object Details.


Note down the URL Path (URI), we will use it to run the data pump import:-
https://objectstorage.us-ashburn-1.oraclecloud.com/n/id0yw/b/BUCKETB/o/BABUR.DMP

Step 4: Generate Token

Auth Tokens are Oracle-generated token strings that is associated with Oracle Cloud Infrastructure username. We will create credential object with the Auth Token strings as password. The credential object will be used to run Oracle data pump import.

In the Oracle Cloud Infrastructure Console, Go to Identity --> Users --> your username  (the one that is not federated) 


On the left hand side, click on “Auth Tokens”. Create a new token by click on “Generate Token”. 


Note down the random generated value, which will be used as credential password in DBMS_CLOUD. Lets say, mine is "My_Token_Password"

Step 5: Create Credential  Object at ADB

conn admin/xxxxxxxx@tp01_low

ADMIN@tp01_low> select * from USER_CREDENTIALS;

no rows selected

BEGIN
  DBMS_CLOUD.CREATE_CREDENTIAL(
    credential_name => 'BABU_CRED',
    username => 'baburxxxxxy@hotmail.com',
    password => 'My_Token_Password'
  );
END;
/

COL CREDENTIAL_NAME FOR A15
COL ENABLED FOR A10
SET LINES 150
select CREDENTIAL_NAME,ENABLED from USER_CREDENTIALS;

CREDENTIAL_NAME ENABLED
--------------- ----------
BABU_CRED       TRUE

Step 6: Create DB User at Destination (ADB)

Create a user called "DABUR"

create user DABUR identified by xxxxxxxxx quota 100m on DATA;

GRANT 
CREATE VIEW, 
CREATE TABLE, 
CREATE SESSION, 
CREATE TRIGGER, 
CREATE SEQUENCE 
to DABUR;

Step 7: Run Data Pump import as ADB admin user.

The data pump import can be run from any external environment where Oracle client and ADB connections are configured and compatible. I am running this from the source database environment.

Created an import parameter file called "BABUR_DP_PAR_IMP.par" with below content:-

remap_schema=BABUR:DABUR
remap_tablespace=USERTBS1:DATA
directory=data_pump_dir    
credential=BABU_CRED     
dumpfile=https://objectstorage.us-ashburn-1.oraclecloud.com/n/id0yw/b/BUCKETB/o/BABUR.DMP
logfile=DABUR_DP_IMP.log 

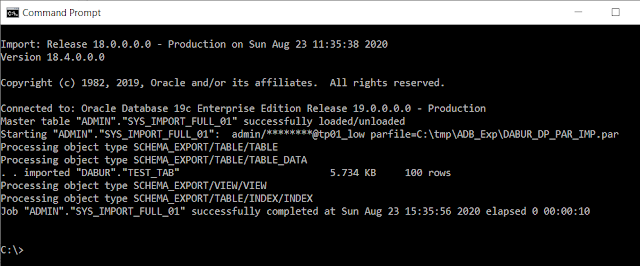
Run the data pump import using the parameter file:- 

impdp "admin/xxxx@tp01_low" parfile=C:\tmp\ADB_Exp\DABUR_DP_PAR_IMP.par


Step 8: Verify the import and Clean up

Check object counts at the destination:-

select object_name,object_type from dba_objects where owner = 'DABUR' order by 1;
 
OBJECT_NAME                    OBJECT_TYPE
------------------------------ -----------------------
TEST_IDX                       INDEX
TEST_TAB                       TABLE
TEST_VIEW                      VIEW

Apparently this simple schema import ran smooth with no errors, but if there were errors that needed to be addressed or recompiled or recreated, you may want to review the (import) log file, which is stored in the ADB server at the "data_pump_dir" directory. Let us see how to retrieve it and later delete it from the ADB server.

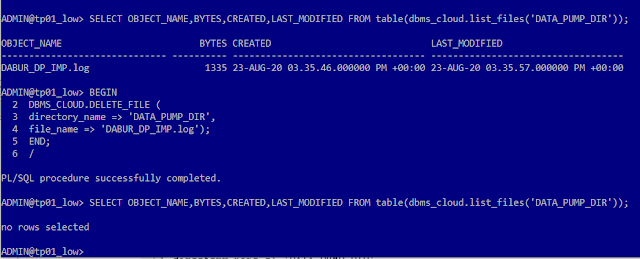
Copy the import log from ADB server to cloud Object Storage 

col CREATED for a35
col LAST_MODIFIED for a35
set lines 150

SELECT OBJECT_NAME,BYTES,CREATED,LAST_MODIFIED FROM table(dbms_cloud.list_files('DATA_PUMP_DIR'));

OBJECT_NAME                         BYTES CREATED                             LAST_MODIFIED
------------------------------ ---------- ----------------------------------- -----------------------------------
DABUR_DP_IMP.log                     1335 23-AUG-20 03.35.46.000000 PM +00:00 23-AUG-20 03.35.57.000000 PM +00:00

BEGIN
DBMS_CLOUD.PUT_OBJECT(
credential_name => 'BABU_CRED',
object_uri => 'https://objectstorage.us-ashburn-1.oraclecloud.com/n/id0yw/b/BUCKETB/o/DABUR_DP_IMP_COPY.log',
directory_name => 'DATA_PUMP_DIR',
file_name => 'DABUR_DP_IMP.log');
END;
/

Now you will see the import logfile copy in the Object Storage, which you can download to your PC and examine it.


Once copied to Object Storage, you can delete it from the ADB server / directory:-

BEGIN
DBMS_CLOUD.DELETE_FILE ( 
directory_name => 'DATA_PUMP_DIR',
file_name => 'DABUR_DP_IMP.log');
END;
/


Here we saw how to migrate a schema from an On-Premises Oracle Database to Oracle Autonomous Databases on Cloud using Oracle Data Pump. 

Hope it helps, appreciate your feedback, thanks.

Monday, June 8, 2020

Manually Installing Oracle TEXT in Oracle 12c R2 [Container] Database


Purpose: Manually Installing Oracle TEXT in Oracle 12c [Container] Database

Environment:
Database Software: Oracle 12c Release 2, currently it has a $ROOT CDB and $SEED PDB.
Operating System: Windows Server 2012 R2 Standard - 64 Bit

Oracle TEXT comes as an out-of-the-box component when you install and create Oracle 12c database using OUI / DBCA tools, but sometimes if you install and create the database manually like I did, you may have to manually install Oracle TEXT like explained here.

Step # 1: Checking the components present and the database size prior to install:-

SQL>  select comp_id, control, schema, version, status, comp_name from dba_registry order by 1;


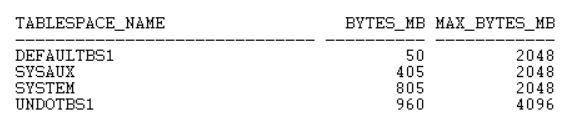
SQL>  SELECT TABLESPACE_NAME,BYTES/1024/1024 "BYTES_MB",MAXBYTES/1024/1024 "MAX_BYTES_MB" FROM DBA_DATA_FILES order by TABLESPACE_NAME;

SQL>  alter session set container = PDB$SEED;

SQL>  SELECT TABLESPACE_NAME,BYTES/1024/1024 "BYTES_MB",MAXBYTES/1024/1024 "MAX_BYTES_MB" FROM DBA_DATA_FILES order by TABLESPACE_NAME;

Step # 2:  Open a windows command prompt, set the environment variables (Make sure Oracle Home and Perl path is present).

> set ORACLE_SID=BABCDB

> set ORACLE_HOME=C:\Oracle12cR2_64Bit_DB\product

> set Path=C:\Oracle12cR2_64Bit_DB\product\bin;C:\Oracle12cR2_64Bit_DB\product\perl\bin;C:\Program Files (x86)\Common Files\Oracle\Java\javapath; C:\WINDOWS\system32;C:\WINDOWS;C:\WINDOWS\System32\...

> cd C:\Oracle12cR2_64Bit_DB\product\rdbms\admin

Step # 3:  My environment has a $ROOT CDB and $SEED PDB, I will be connecting to the $ROOT to install it.

perl catcon.pl -p 2 -u SYS/xxxxxxxxxx -l C:\temp\spatial -b catctx_install_babu -a 1 F:\Oracle12cR2_64Bit_DB\product\ctx\admin\catctx.sql 1babu 1SYSAUX 1TEMPTBS1 1NOLOCK;

catcon: ALL catcon-related output will be written to [C:\temp\spatial/catctx_install_babu_catcon_4620.lst]
catcon: See [C:\temp\spatial/catctx_install_babu*.log] files for output generated by scripts
catcon: See [C:\temp\spatial/catctx_install_babu_*.lst] files for spool files, if any
catcon.pl: completed successfully

Step # 4:  Verify the components:-

sqlplus SYS/xxxxxxxx@DEVCDB AS SYSDBA

SQL> SELECT TABLESPACE_NAME,BYTES/1024/1024 "BYTES_MB",MAXBYTES/1024/1024 "MAX_BYTES_MB" FROM DBA_DATA_FILES order by TABLESPACE_NAME;


SQL> select comp_id, control, schema, version, status, comp_name from dba_registry order by 1;


SQL> ALTER SESSION SET CONTAINER=PDB$SEED;

SQL> SELECT TABLESPACE_NAME,BYTES/1024/1024 "BYTES_MB",MAXBYTES/1024/1024 "MAX_BYTES_MB" FROM DBA_DATA_FILES order by TABLESPACE_NAME;


Step # 5:  Configure Language-specific default preferences (mine is U.S. English), connect as CTXSYS user and run below script:-

connect CTXSYS/xxxxx@devcdb 

@F:\Oracle12cR2_64Bit_DB\product\ctx\admin\defaults\drdefus.sql

After successful install,  lock the CTXSYS account and expire its password. 

conn SYS/xxxxxxxxxx@DEVCDB AS SYSDBA

Check for invalid objects in the database. If present, run utlrp.sql or recompile invalid objects.

col OBJECT_NAME for a30
col OBJECT_TYPE for a30
col OWNER for a20
SQL> select owner,object_name,object_type from dba_objects where status <> 'VALID' order by 1,2,3;

no rows selected


Sunday, May 24, 2020

Manually Installing Oracle Database Software in Silent Mode using Response File on Windows OS

Purpose: Manually Installing Oracle Database Software in Silent Mode using Response File on Windows OS

Environment:
Database Software: Oracle 12c Release 2
Operating System: Windows Server 2012 R2 Standard - 64 Bit

Preparation:-

1. Download the oracle software and extract it in a temporary folder [C:\Tmp\database]

2. I chose to create a local windows, user not part of any group (for now), and used it (in the response file) for my installation


3. Created a folder for ORACLE_BASE

4. Created a response file called "db_resp_12cR2_simple.rsp" with below parameters:-

DECLINE_SECURITY_UPDATES=true
ORACLE_BASE=F:\Oracle12cR2_64Bit_DB
ORACLE_HOME=F:\Oracle12cR2_64Bit_DB\product
SECURITY_UPDATES_VIA_MYORACLESUPPORT=false
oracle.install.OracleHomeUserName=OracleWinUsr
oracle.install.OracleHomeUserPassword=xxxxxxxxxxx
oracle.install.db.ConfigureAsContainerDB=false
oracle.install.db.InstallEdition=EE
oracle.install.db.isRACOneInstall=false
oracle.install.option=INSTALL_DB_SWONLY
oracle.install.responseFileVersion=/oracle/install/rspfmt_dbinstall_response_schema_v12.2.0


Install:- 

5. Open command prompt as Administrator, navigate to the extracted folder where setup.exe is located and start the installation


cd C:\Tmp\database\

setup.exe -silent -noConsole -skipPrereqs -noconfig -waitForCompletion -responsefile C:\Tmp\db_resp\db_resp_12cR2_simple.rsp


Once above setup.exe command is executed, the cursor control will come back to the command line.

Verify:- 

6. The install status and progress can be found in the log files at “C:\Program Files\Oracle\Inventory\logs” like:-
installActions.log
oraInstall.err
oraInstall.out
silentInstall.log


For example, in my installActions.log it gave below message in the last section:-

*** End of Installation Page***
The installation of Oracle Database 12c was successful.


In my silentInstall.log it had below message:-

silentInstall.log
The installation of Oracle Database 12c was successful.